FAQs and Troubleshooting Tips
# Which version should I use »
Read this page: How to use GCam ports.
# How to install GCam? »
.apk files are Android apps. After downloading the apk file (how to find a good version), you need to install it.
Using a file manager/explorer app, click on the .apk and follow the instructions. If you need help, see the how to install an apk file guide.
# Can't install the app (App Not Installed) »
Sometimes the installation fails ("App Not Installed", "parsing error", "couldn't install", etc). Possible reasons and fixes:
- If you already have a GCam installed, you may have to uninstall it before being able to install the new one.
- It's possible that the GCam app uses a "package name" from a system app is installed on your phone. If the modder provides different versions of the same update, try a different package.
- The GCam version might not be compatible with your Android version. If you're using an older Android version, you may have to use an older GCam base. Old GCams may also not work on newer Android versions.
- Older phones often have a 32-bit processor and use 32-bitAndroid. Google Camera (and Google Phones) have been 64-bit-only for years. If you have a 32-bit phone, you may have to use GCam Go instead.
- It could also be a problem with the download. Something failed and the file is "corrupted". Download again on a stable connection.
In most cases, the problem is either an incompatibility between the app and the Android version or a package name conflict.
# What are package names (multiple apks in one release)? »
Some modders share multiple apk files with each release. For example:
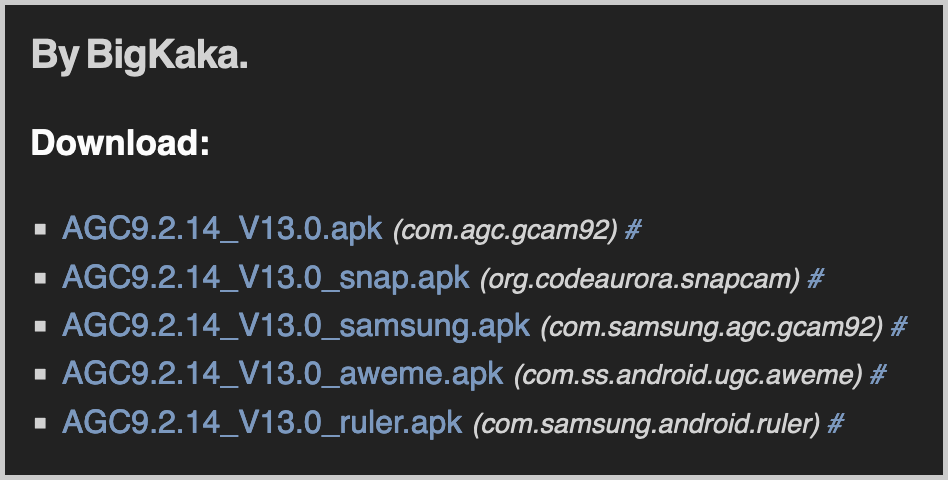
- What's the difference between these files?
They're all the same version, but have different package names (the package name is the text next/under the download link). Every bug fixed, every new feature, etc, is available on all apks, but the package name is different.
A package name is the real name of an Android app. For example, the package name for Chrome is com.android.chrome. Users see a friendly name, but Android uses the package name.
- Why are different package names needed?
Package names are usually needed to access all cameras and/or to enable features like Google Lens.
Some brands (eg: OnePlus, Samsung, etc) restrict access to all cameras. They have a "whitelist" of apps (package names) that can access those cameras, so modders release their versions with package names that are on those lists.
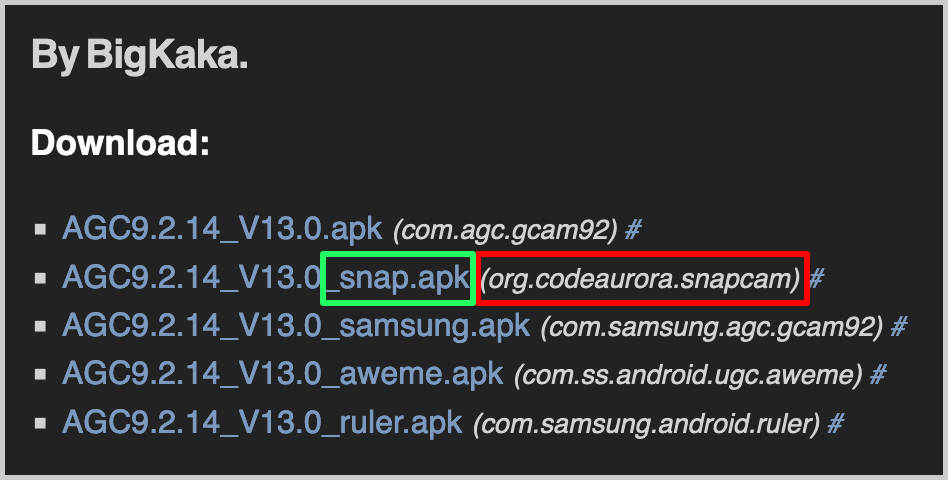
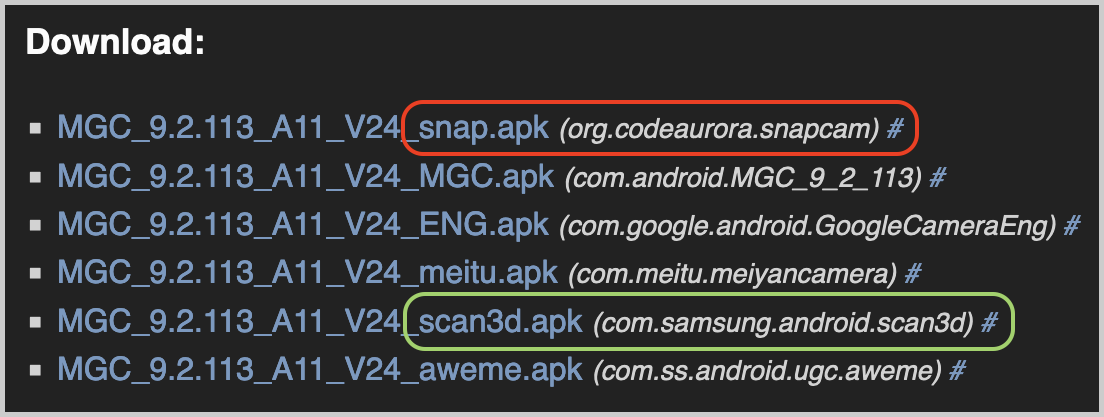
For example, OnePlus usually allows org.codeaurora.snapcam (sometimes referred to as "snap"), so that's what's usually recommended for OnePlus devices:
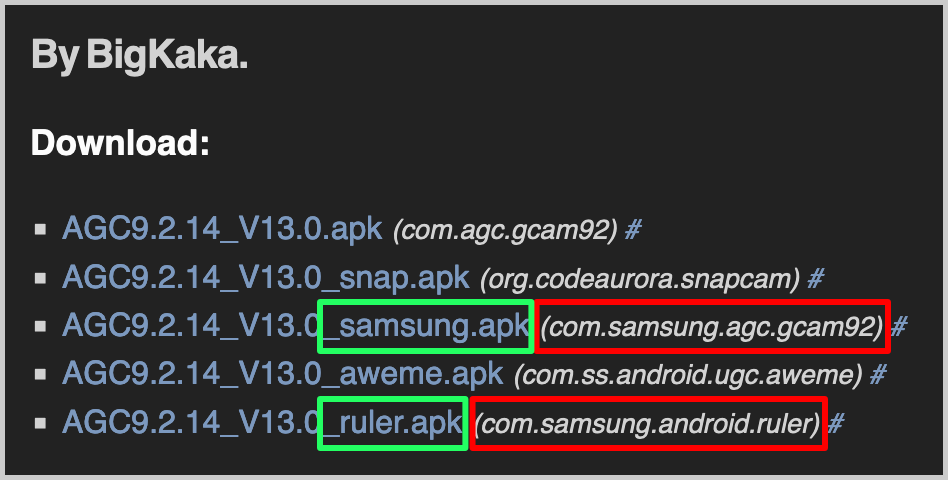
For Samsung, you'll need to use one of the samsung packages (sometimes referred to as "scan3d" or "ruler"):
A few brands allow the TikTok app to access all cameras, so modders sometimes offer TikTok's package name (com.ss.android.ugc.aweme) to work around these restrictions.
- Other uses:
Different package names lets you install multiple GCam apps side by side. For example, in the example above, you'd be able to install all 4 apks, even though they're the same app.
This is useful if you want to have different versions installed, when you want to test a new version without uninstalling the version you're using, want to have different versions with different settings, etc.
- Which package name should you use:
Since there's no rule that applies to all phones, you need to test them yourself or ask on a thread or group for your phone. With this said, when in doubt, use the first apk. If it doesn't work, try the second (and so on).
There are, however, some package names that usually work on most phones from some brands. For example:
- OnePlus:
org.codeaurora.snapcam("snap", "snapcam"),com.ss.android.ugc.aweme"aweme" orcom.meitu.meiyancamera"meitu". - Samsung:
com.samsung.android.rulerorcom.samsung.android.scan3d. Sometimes other "samsung" and even "aweme" works. - Realme/Vivo:
com.ss.android.ugc.awemeorcom.meitu.meiyancamera.
Depending on the phone and on the whitelist used by the brand for that specific phone, you might be able to also use other package names. For example, while some OnePlus devices need org.codeaurora.snapcam for all cameras to work, some of their devices also support other names (eg: com.google.android.GoogleCamera).
Some brands (ASUS, Xiaomi) don't have these restrictions at all, so you can use any package name and still have access to all cameras. Most custom ROMs also don't have restrictions.
- Can't get all cameras to work with any apk?
Assuming you did everything right (tested all package names and made sure that the auxiliary cameras setting is enabled), it's possible that your phone completely blocks access to all cameras.
Unfortunately some brands (eg: OPPO, Realme) are very restrictive and using a special package name doesn't work. Other brands allow access on some, but not all hardware. For example, OnePlus devices with Snapdragon SoC/processors allow users to access all cameras (with a package name) while OnePlus devices with Mediatek don't (eg: many of the OnePlus Nord phones).
The only fix for this is to use a custom ROM not based on the stock/original ROM (eg: ColorOS, OxygenOS, MIUI, etc) as they don't limit access or need specific package names.
# "Unsafe App Blocked" warning/message (Google Play Protect) »
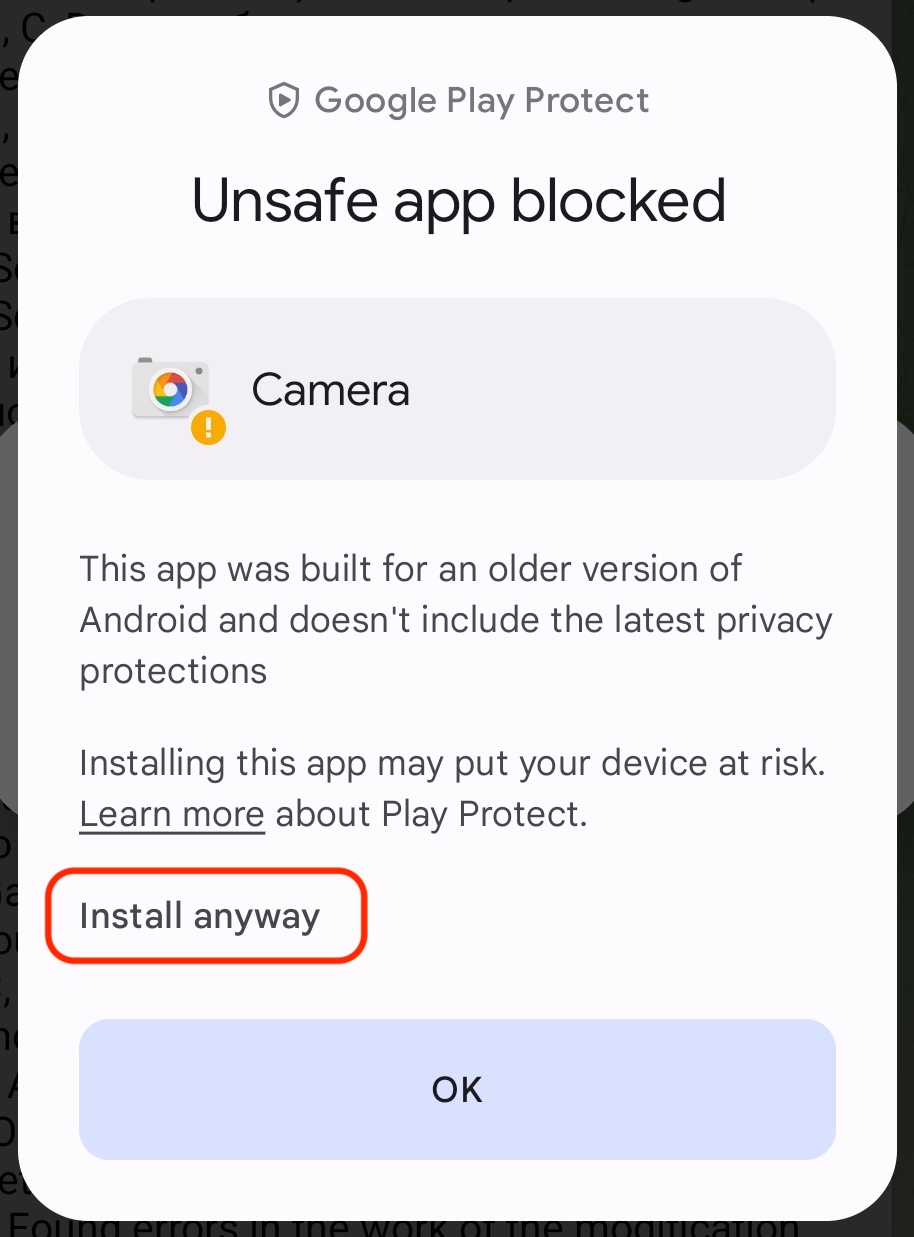
Google Play Protect sometimes warns users when installing "old" apps. Older GCam mods target lower "SDK versions" (older Android versions). Due to the way permissions are handled in old Android apps, Google wants everyone to target newer Android versions, where permissions are more restrictive.
As of 2024, you may see the "Unsafe app blocked" warning. To install, click on "more details":
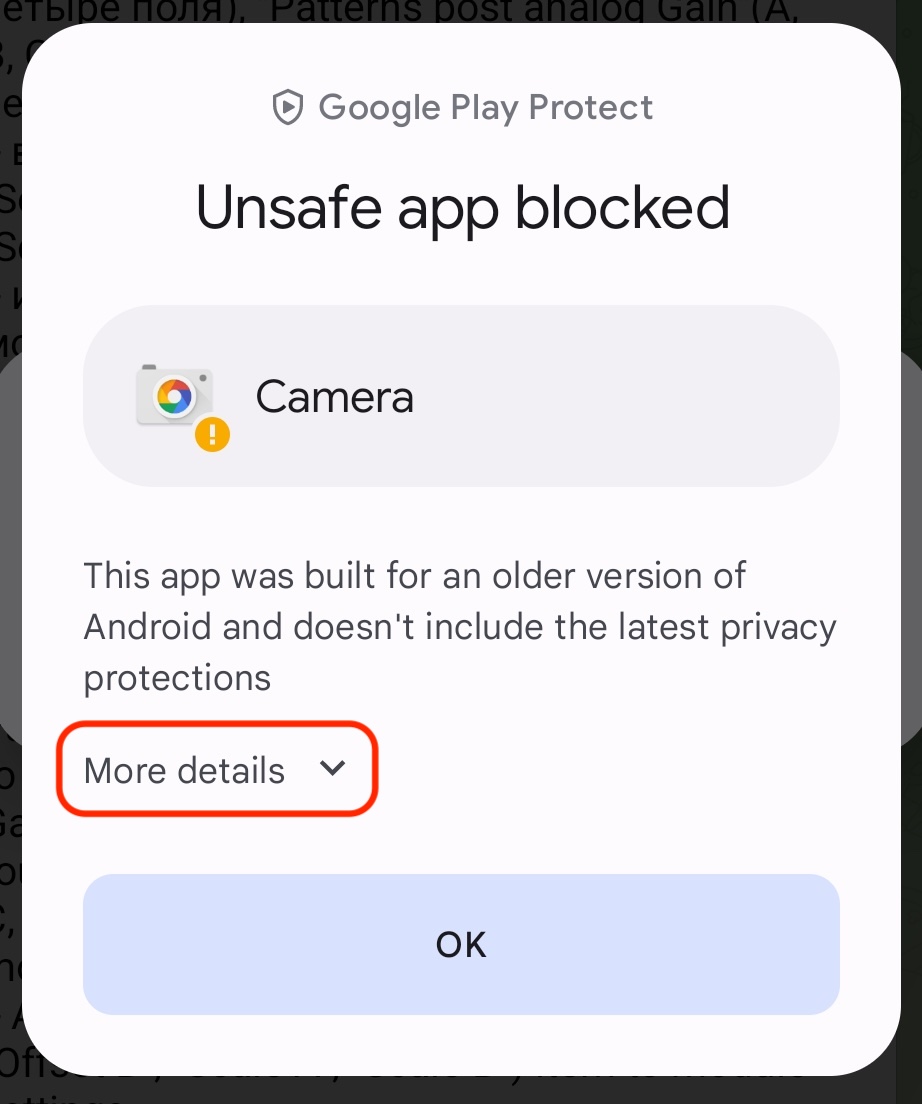
This shows the "install anyway" option, which starts the installation:
# App crashing just after being opened »
There are a few reasons why GCam may crash right after opening:
- GCam doesn't work on your hardware.
- Maybe you're using the wrong package name.
- The version you're using was made for a different phone.
- You're using the wrong settings for your phone.
- The camera2 API is disabled on your phone.
- GCam version isn't compatible with the Android version you're using.
- AppOps, XPrivacyLua, etc, may be causing the problem.
- GApps are not available.
Let's go into the details of each point.
- Compatibility with your hardware:
GCam is made for Google devices, so it only works on phones with similar hardware/software. This means that it doesn't work on most phones with Kirin, Exynos, or Mediatek SoCs, for example.
Read the how to use page to learn about the requirements.
You can try GCam Go if regular GCam doesn't work for you. It's not as good, but it might be better than the quality of the stock camera app..
- Wrong version for your phone:
If you install a version that was optimised for a phone that is different than yours (eg: different limitations, bugs, etc), GCam may crash on your phone. I recommend you read the how to find a good version page or try one of the suggested versions.
- Wrong settings for your phone:
If GCam was working fine, but stopped working after charging a setting or loading a config file, it's possible that some setting that doesn't work well on your device was enabled and it's causing the crashes.
Clean the app data or reinstall GCam to start fresh, with default settings.
If this happens after updating GCam and the clean install doesn't work, then the new version may not be compatible with your phone.
- camera2 API not available or limited:
In plain english, the camera2 API is how GCam "talks" to the camera sensors on your phone. Old phones and many low end devices either don't support this API or are sold with it disabled. In this case, when GCam tries to use the cameras, it can't and ends up crashing.
On some phones, it is enabled but doesn't support all features needed by GCam.
On other phones, the support itself is there, but the API is disabled by the brand. In may cases, this can be enabled by editing the build.prop file (root required). If you are rooted, use an app like BuildProp Editor, and add the following string:
persist.camera.HAL3.enabled=1
Please note that:
- This can cause other issues (eg: breaking the stock camera app).
- Sometimes this string is already available. In that case, change it value "0" to "1".
If the API is broken or can't be enabled, try one of the GCam Go mods. Quality isn't as good as regular GCam, but it works on phones with these limitations.
- Version incompatible with your Android version:
This usually happens when you're trying to use a version made for a newer Android version. GCam opens, expects to see some feature available on a newer Android version, and since it's not there, it crashes.
In this case, you'll need to use an older GCam version made for your Android version.
- AppOps, XPrivacyLua, etc:
Some privacy enhancing tools/features may block access to something GCam needs. For example, if GCam can't access the cameras, it will crash.
On XPrivacyLua, for example, the "use tracking" setting is known to cause problems on phones that use camera hal fixes, so you may have to unlock it.
- Phones without GApps:
If you use a phone without Google Apps (GApps), most GCam versions will crash. See how to use GCam without GApps.
# App crashing after taking pictures »
There are many reasons for this to happen, but often it's caused by:
- Motion Photos: Sadly this feature causes issues on some phones. Disable it and try again (learn more here).
- Incompatible features: Depending on the hardware used by your phone, processing may fail and result in a crash:
- Sabre: Some versions have a setting to disable "sabre". It's supposed to improve detail, but it doesn't work on non-Sony sensors. In this case, disabling it should fix the crash.
- Use a different GCam: The GCam version you're using may not be compatible with your phone. Try to find a better one.
If nothing fixes the crash, I recommend you ask for help on a forum, telegram group, etc, for your phone. I have a list of forum threads and groups here.
# Can't view photos/videos from inside GCam »
Some GCam versions need the Google Photos app to display photos and videos inside GCam. If the app isn't installed, GCam will return to the viewfinder.
[Note: you just have to install the app, there's no need to login (and upload your photos to Google) or use the app.]
- GCam 7.3+:
Some versions have a setting to disable Google Photos (check GCam settings). On GCam 7.3 or newer, this setting will use your default gallery app. Since most gallery apps don't support GCam features (eg: motion photos) or expect the processing delay, the experience won't be as good.
If you don't want to install Google Photos, there's another Google app that can be used: Gallery Go. This is just a simple gallery app without the upload feature. Install it, set it as default gallery app, and the experience will be similar to having Google Photos installed. Note that you don't have to use this gallery app. It just need to be installed.
- GCam 7.2 or older:
Versions based on GCam 7.2 or older usually have a setting to disable Google Photos. This setting will use a built-in Gallery app, so no additional app is needed. Explore the settings menu to find this setting*.
If it's not available, the only solution is to install the Google Photos app.
[* On old versions, the setting is under "Debugging and tools". Uncheck "camera.use_photos" and restart the app.]
# HDR modes and how to fix over exposed photos »
Google's HDR processing is the main reason to use GCam mods. There are 4 HDR modes:
- HDR Off: No HDR, no quality improvements. Broken on some phones/mods. Avoid using.
- HDR+ ON: Basic HDR. ZSL (Zero Shutter Lag). Fast, but has but poor dynamic range.
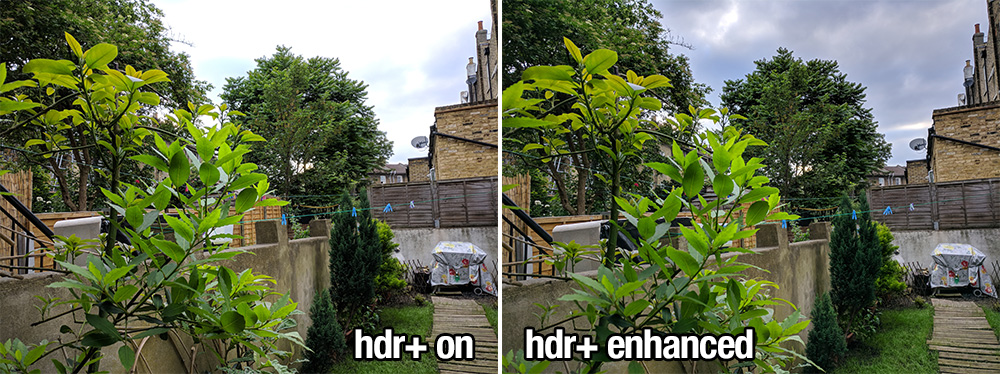
- HDR+ Enhanced: The best HDR. Slower, uses multiple frames, but has better dynamic range and usually more details.
- HDRnet: Newer GCam versions support "HDRnet" or "instantaneous HDR" (read more here) which replaces the 3 modes above. It's as fast and provides better quality than HDR On, but isn't as good as HDR Enhanced.
Use HDR Enhanced if you want the best quality possible. It's especially useful when taking pictures in harsh conditions. HDR On and HDRNet are fast, but there's a quality trade-off.
Sometimes these controls are disabled by default. Explore the settings menu and look for a setting to enable "HDR+ Control". For example:
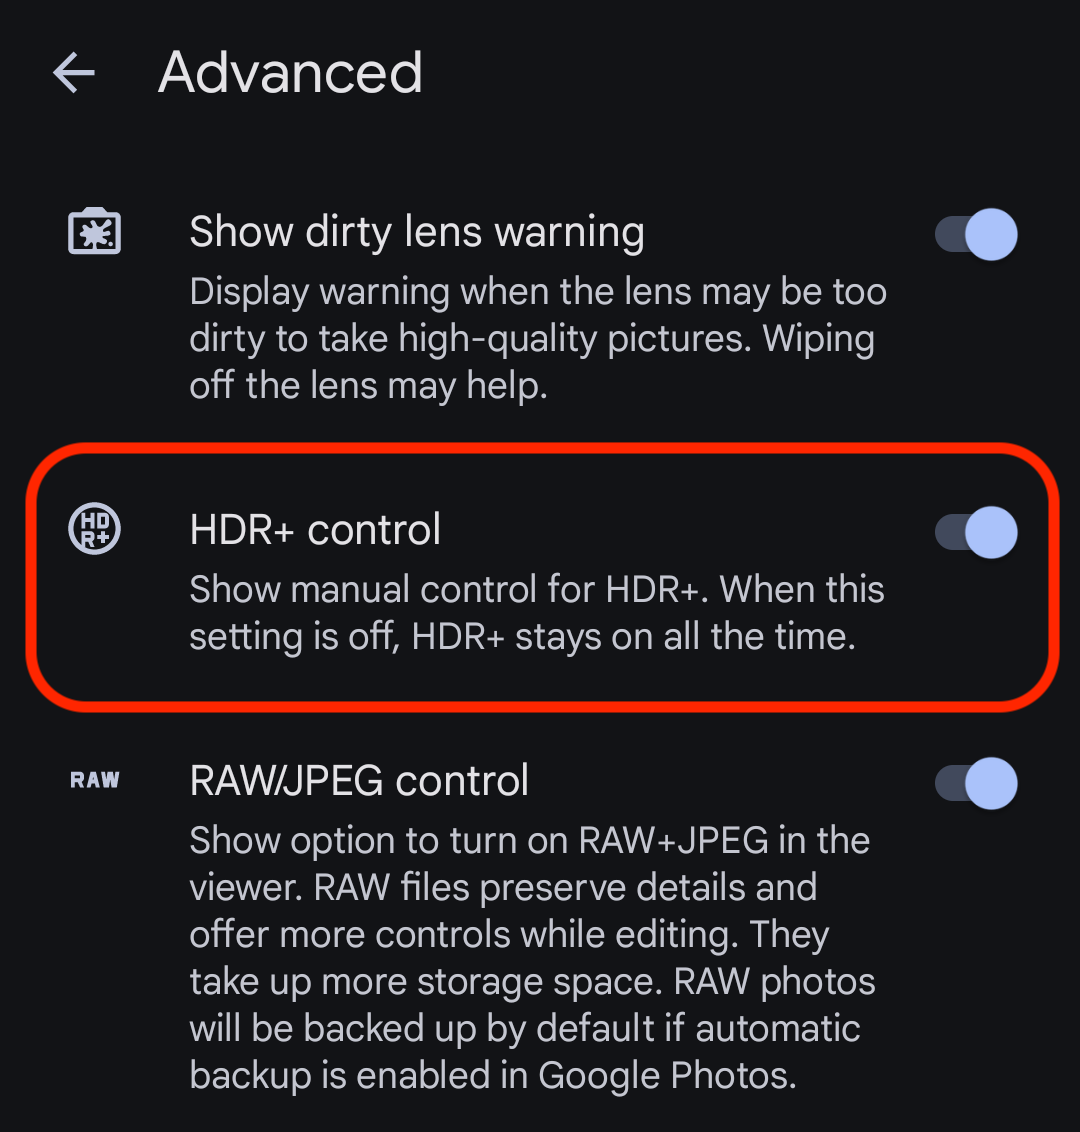
When enabled, the options are on the viewfinder. On GCam 9, click on the viewfinder options (bottom left icon):
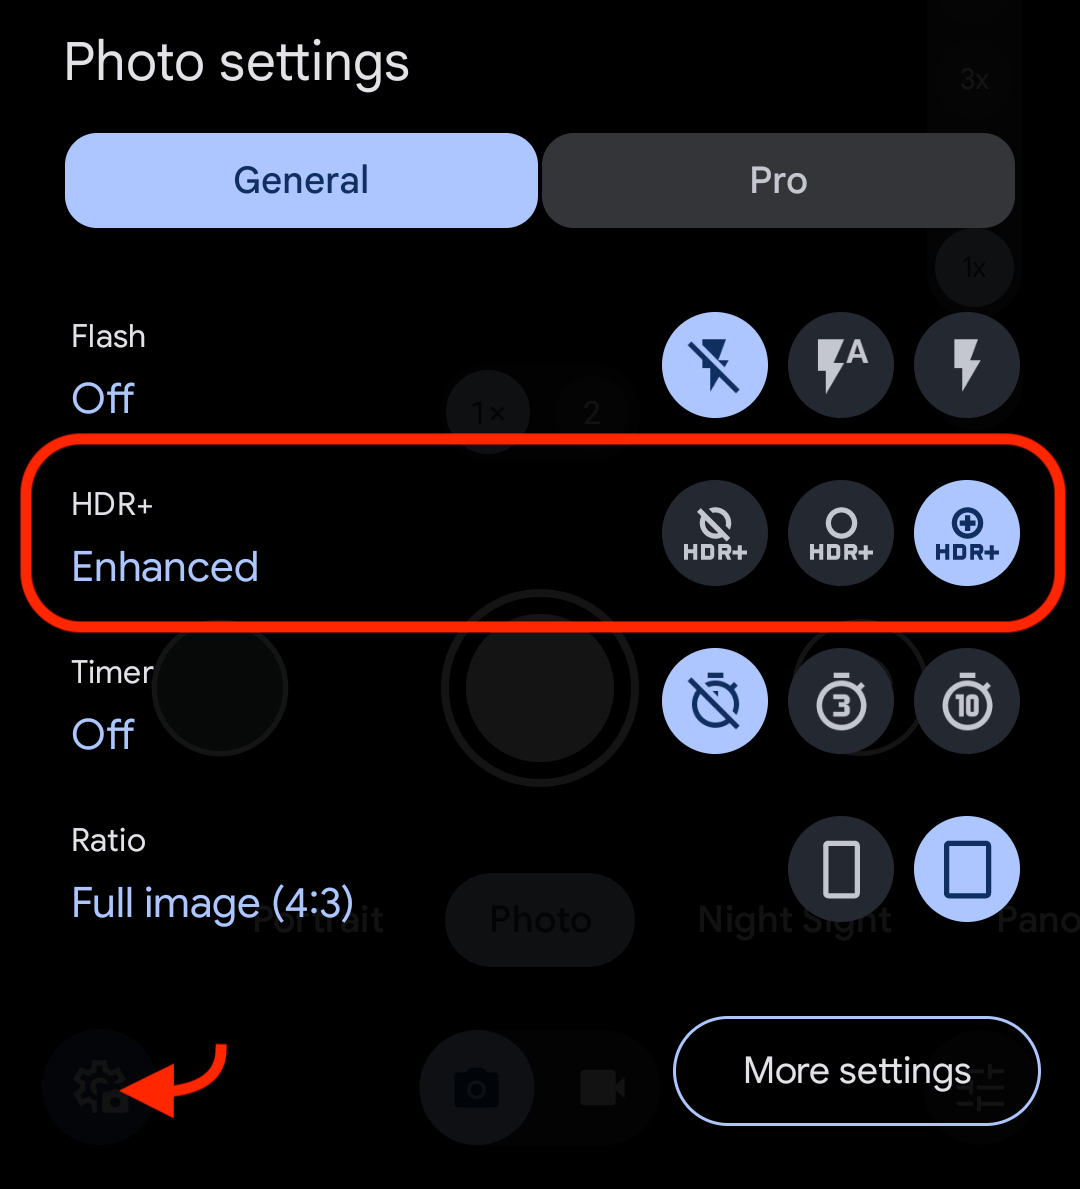
On GCam 7 and 8, swipe down:
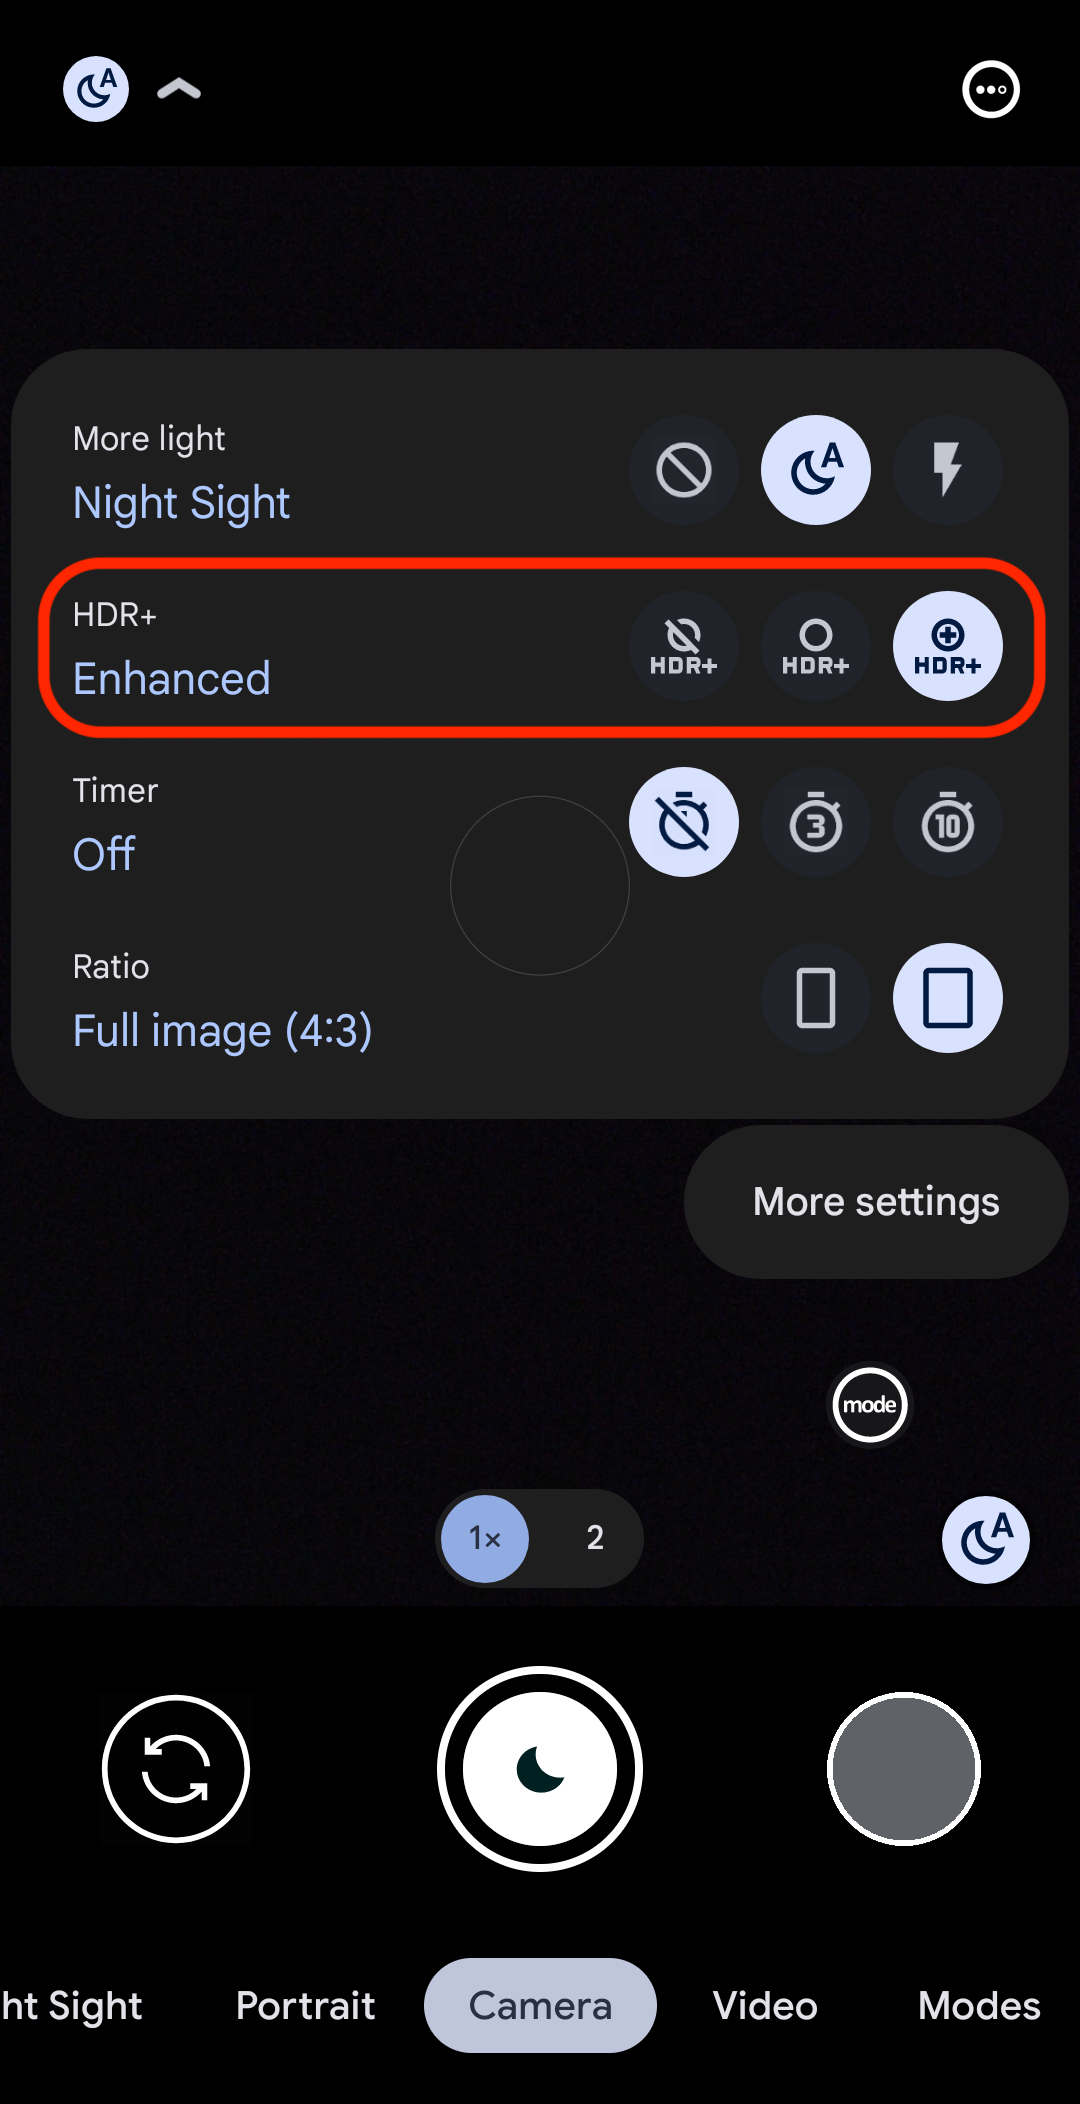
On GCam 6:


HDR On vs HDR Enhanced (look at the sky):
# Stuck HDR processing »
This issue happens when:
- You use old GCams on newer Android versions.
- Something is limiting/stopping GCam's background processes.
- You're using a cloned app.
1: Sometimes old GCam don't work very well on newer Android versions. Newer GCams may also not work well on older GCam versions. Try a different version. For example, if GCam 6 is failing on Android 10, try GCam 7 or 8.
2: Some brands use aggressive background usage to save power, but GCam needs to process each picture to apply HDR and their optimisations. This can be fixed by disabling battery optimisation for this app.
3: If you're using a cloned app (eg: so you can have more than one version of the same app), that may cause some issues. One common problem is the processing of the picture that gets "stuck". If this happens, install the "original" apk instead.
# Slow motion issues »
Due to differences in the way Google and other brands do slow motion, this feature is often broken or quality isn't very good.
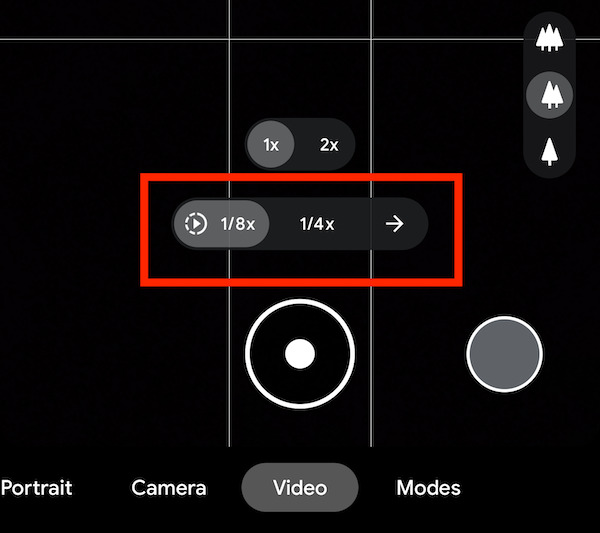
With this said, it works on some phones. Sometimes you don't have to change anything, but sometimes you need to select the correct frame rate for your phone (eg: 120FPS instead of 240FPS). On older GCam versions the setting will mention the number of frames and could be inside the settings menu. On newer versions it's right in the viewfinder and often mentions the speed. For example, on GCam 8 it looks like this:
- Alternatives:
If you can't use the stock camera app, there are 2 solutions that work on lots of phones.
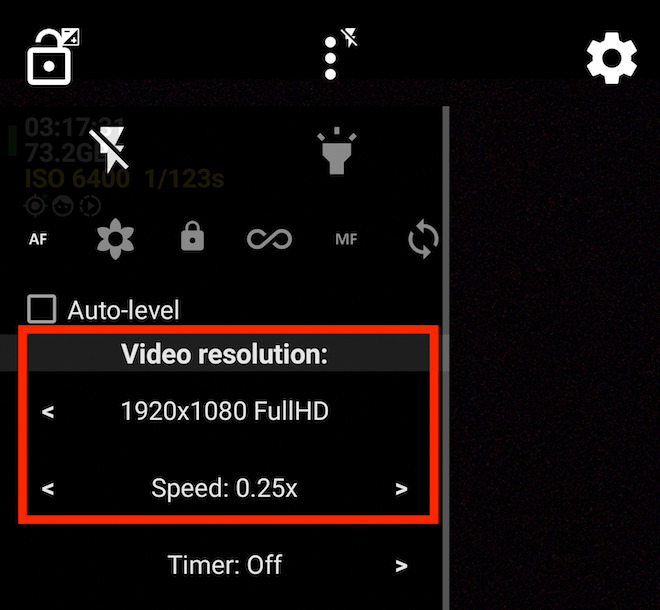
For phones with good camera2 api support, you can use the free and open-source Open Camera (Play Store, F-Droid). Install it and go to Settings » Camera API » select "Camera2 API". Then go to video mode and from the "drop down" menu move the "speed" to the left. There's "normal", 0.5x, 0.25x, 0.15x:
If this doesn't work for you, the other alternative that works even on older phones is a modified version of an old Nokia Camera. You can read about the mod over at XDA and download the apk file here: NokiaProCamera.apk.
- Note about old GCam/Android versions:
- This feature is broken on most GCam 5, but works on many mods based on GCam 6 and above.
- Older Google Camera versions supported slow motion on many Android 7 ROMs, but some phones needed an updated
media_profiles.xmlfile with high speed profiles. Try to find a XDA thread for your phone, maybe other users with the same phone have a solution for this problem.
# How to use Astrophotography »
Astrophotography was introduced with GCam 7. It's part of the Night Sight (night mode) feature.
Some GCam mods allow you to force enable astrophotography (off/on or off/auto/on), where all pictures taken with Night Sight will use astro mode. Some only allow you to use "auto" mode, where GCam checks 1) if it's dark and 2) the phone is still (eg: on a tripod) before "switching" from night mode to astro mode.
This mode does long exposures. Devices that restrict this (eg: some Samsung phones) won't be able to use it.
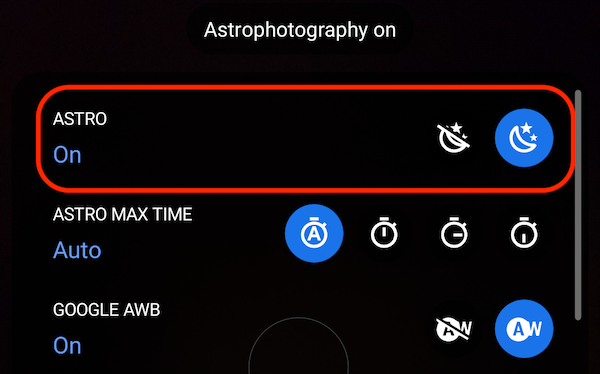
Most GCam 7, 8, 9, etc, have controls for this mode the viewfinder options. Some examples:
Off/On on a GCam 7 mod:
Off/Auto on a GCam 8 mod:
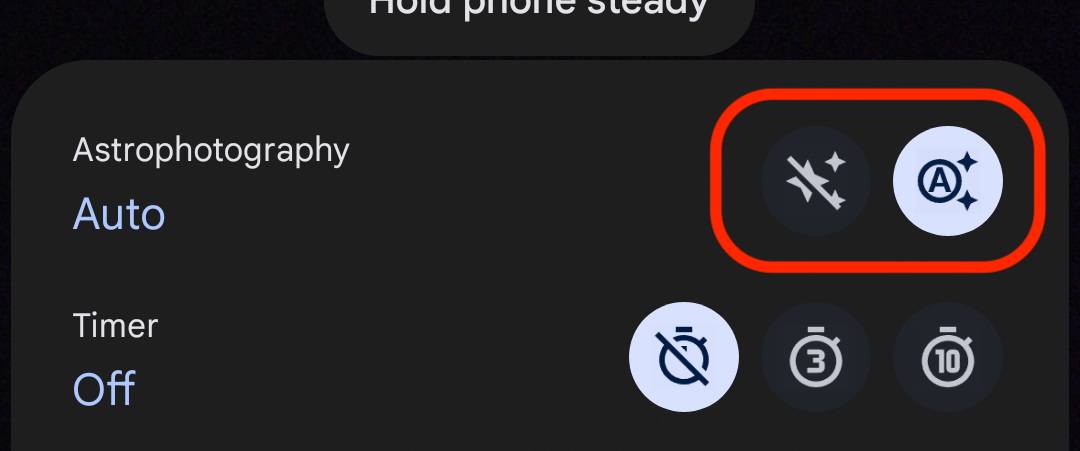
Off/Auto/On on a GCam 9 mod:
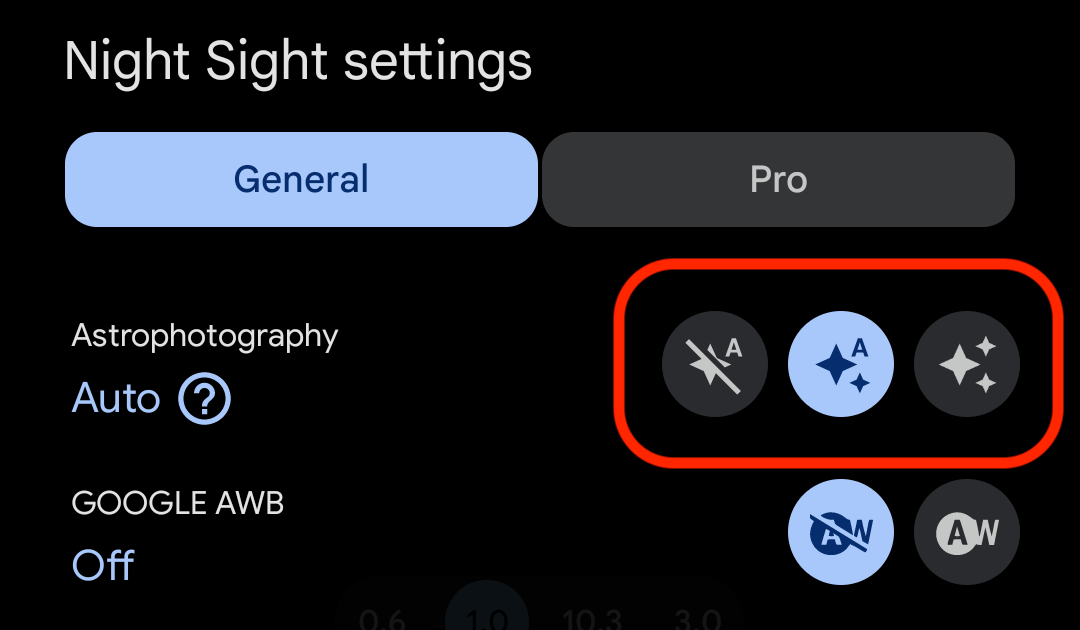
Off/Auto/On on a GCam 8 mod:
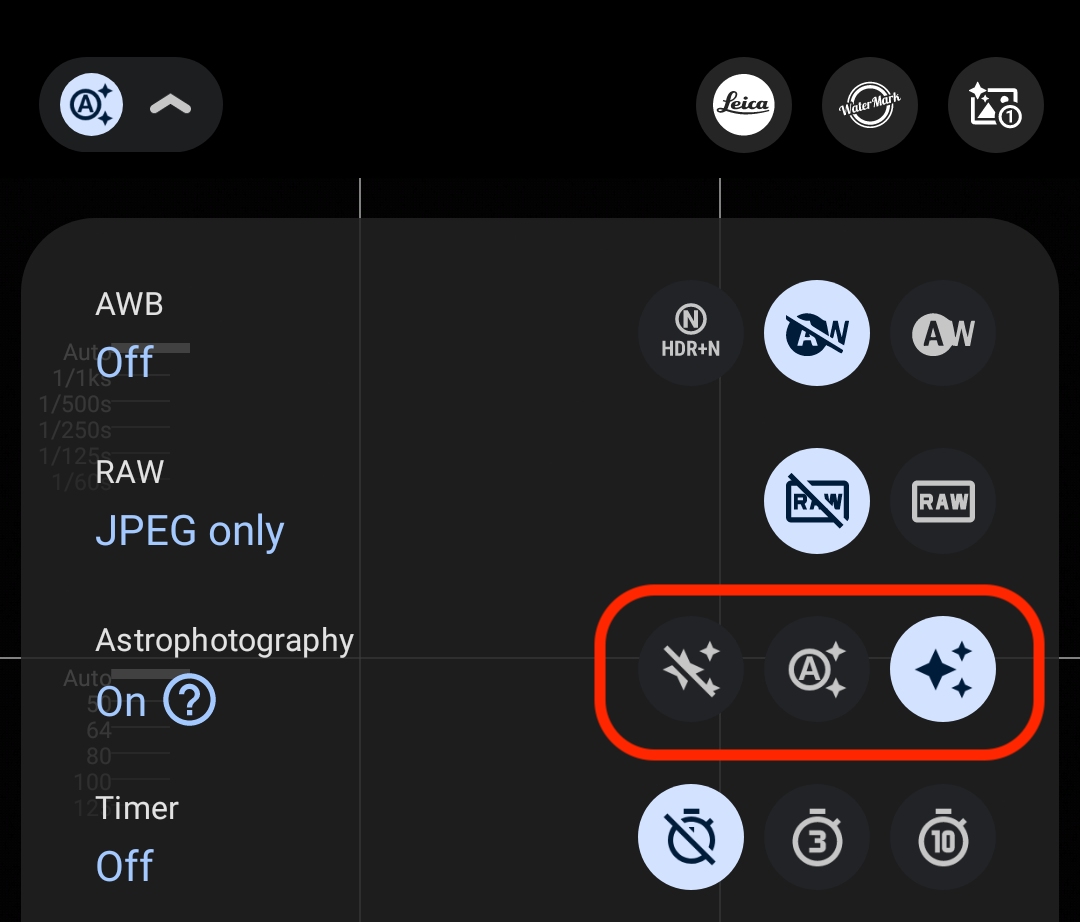
- Some notes:
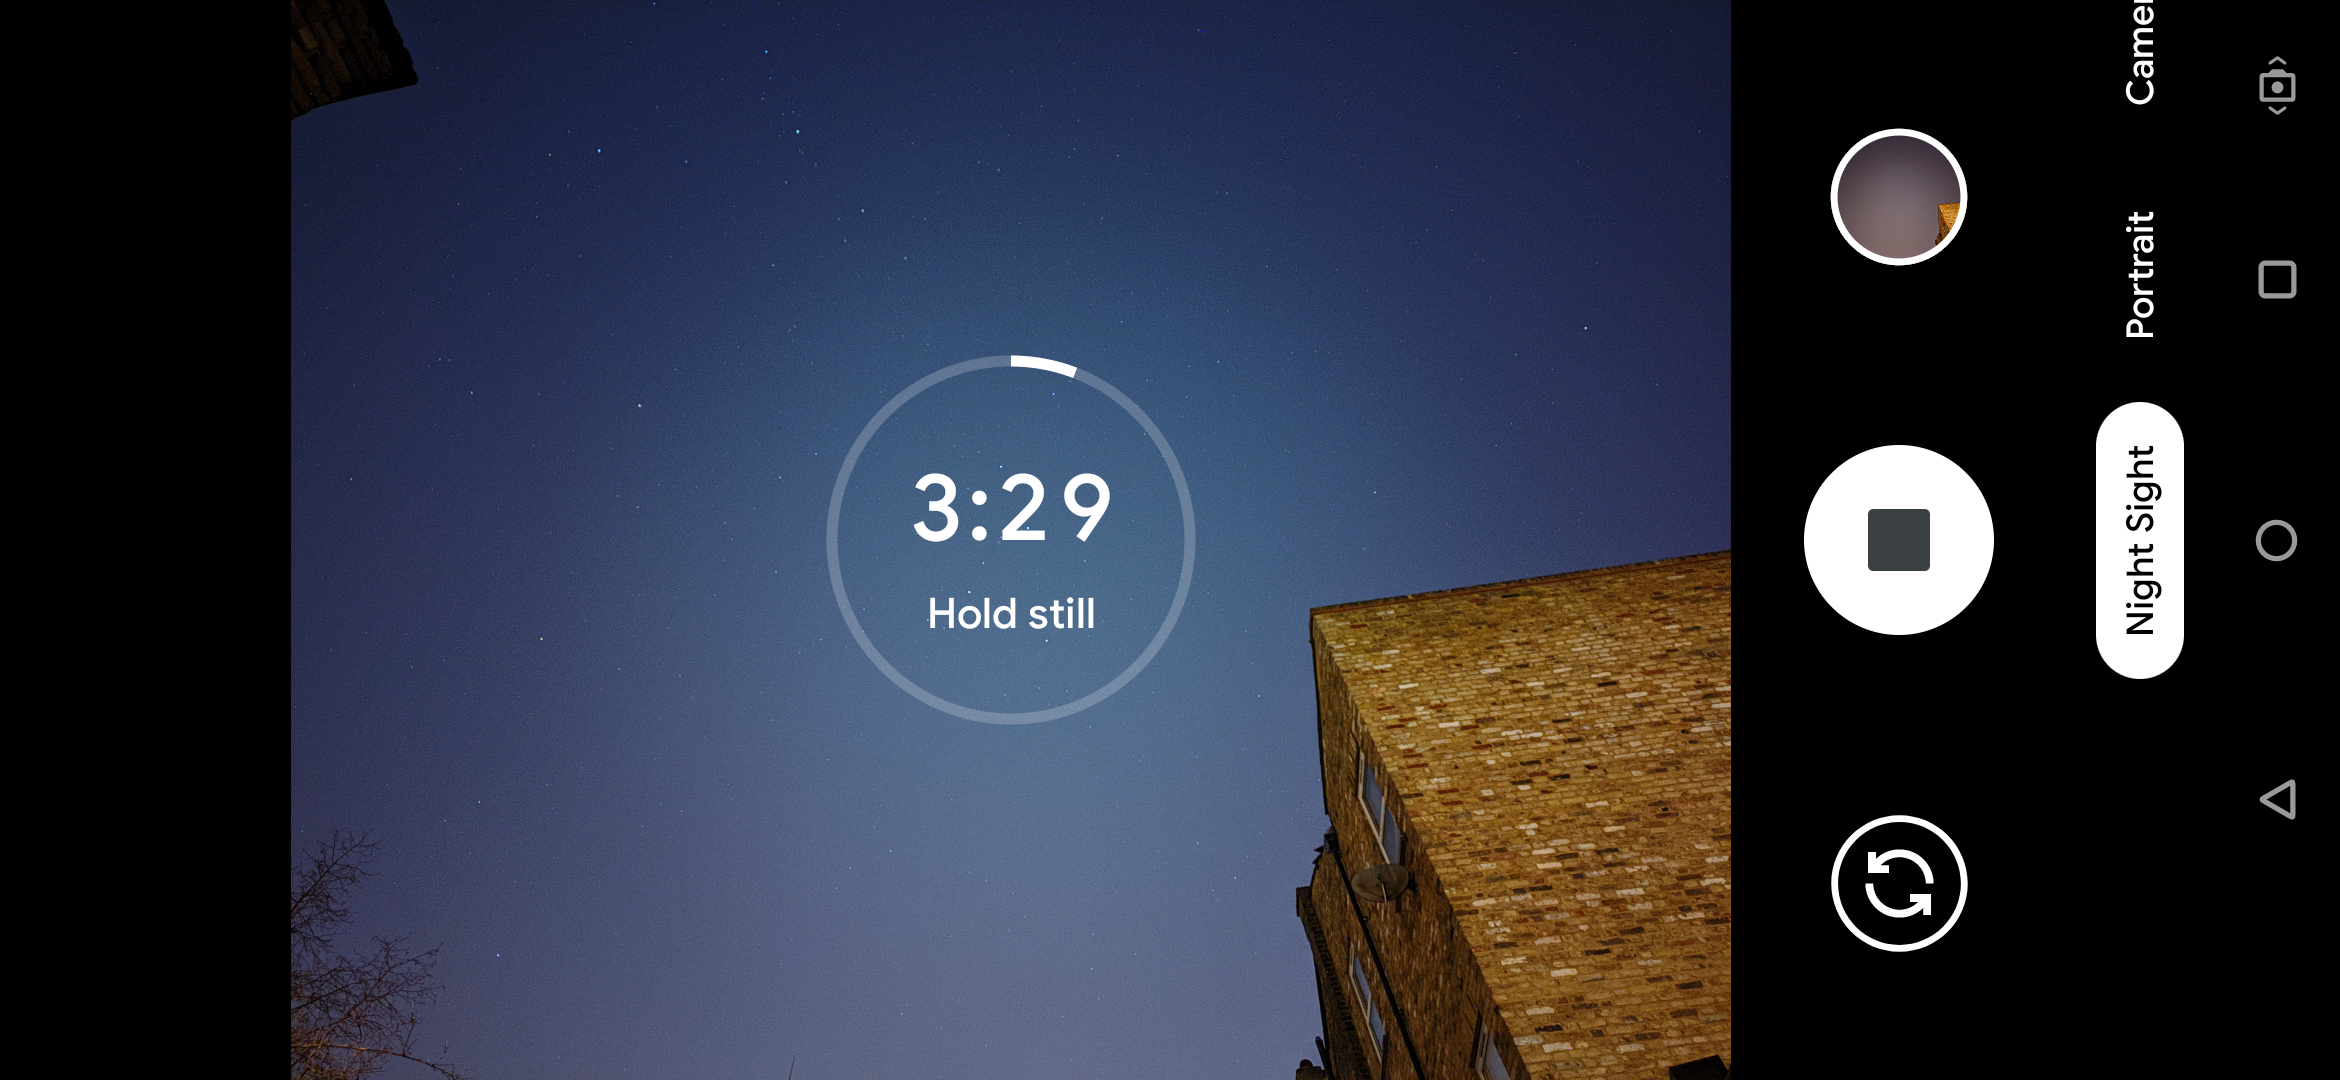
- Depending on the darkness and phone, photos can take a few minutes (usually 2-7 minutes).
- Remember that in "auto" mode, GCam only enables astro if the phone is still and it's really dark.
- If the setting isn't available, it's possible that it works like in the original GCam app (uses auto mode).
- Early versions of GCam mods had the option to force astro inside the settings menu, not in the viewfinder.
- Exposure times and tips:
For detailed results, your phone should be stable. Using it handheld will result in blurred pictures.
The exposure times depend a lot on the device. Some phones only support a few seconds while others support minutes.
# How to use Top Shot / Motion Photos »
Top Shot / Motion Photos is a feature that records a small video every time you take a picture, allowing you to see what was happening before/after you took the picture. To see the picture/video, open the photo using Google Photos (you might have to click play/stop on the top right corner).
- Requirements:
- Google Photos app: other gallery apps only display the static image.
- GCam app with the feature: most versions based on GCam 5.x (or newer) support this feature.
- Android 8 or newer: it doesn't work on Android 7 or older.
- HDR On: it doesn't work with HDR Enhanced.
- Downsides:
- Video doesn't play on other gallery apps, computers, or if you send them via an app like Telegram, Signal or Whatsapp.
- File sizes are bigger than usual. Keep this feature off if you don't need it.
- UI:
This is how this feature looks like on Google Camera 6 (some versions come with motion photos disabled by default, enable it in the settings menu):

While taking a picture:

Available settings:

The UI is different on GCam 7+, but still works like before:

- Crashes:
Due to code differences between Google's devices and other brands, it's not always possible to record a full resolution video with motion photos.
Some versions allow you to set the resolution. Some phones need one with a 16:9 aspect ratio. On other phones, it will only work with a very small resolution. Try them all if you are experiencing crashes.
On versions without a setting, it needs to be changed by the modder. Try another version, perhaps from a different modder and see if it works or report the problem to the developer.
If this feature is causing issues and you can't fix it, you should set it to "off".
# How to use multiple cameras, what's AUX, etc »
Support for multiple cameras is available on different GCam mods. While older mods based on GCam 6 and 7 support this (some of them at least), only newer versions of GCam 7 and GCam 8 started doing it well, as that's when the first Google Pixel was released with more than one back camera and Google added proper support into Google Camera. For example, a newer mod will usually allow you to have different settings per camera, while older ones could only have one set of options for all cameras.
You should know the meaning of the following names/expressions:
- Camera IDs: Each camera is designated by a number. That's the "camera ID". Usually 0 = main rear, 1 = main front, 2 = wide rear, etc.
- Aux: Short for auxiliary cameras, so the extra cameras (wide, telephoto, etc). Sometimes used in the settings and discussions.
- Lens or Modules: Same as aux, it's the extra cameras.
In order for GCam to use all cameras, the phone needs to allow 3rd party camera apps to access them. There are work arounds for phones that block it (see "devices with restrictions" below).
- Enabling the extra cameras:
Some mods enable them by default and you'll see the controls in the viewfinder (in early mods, the switch camera button would go through all cameras). You only need to change the settings if you want to disable one of them or change the camera IDs for each button. Some examples of the UI icons:
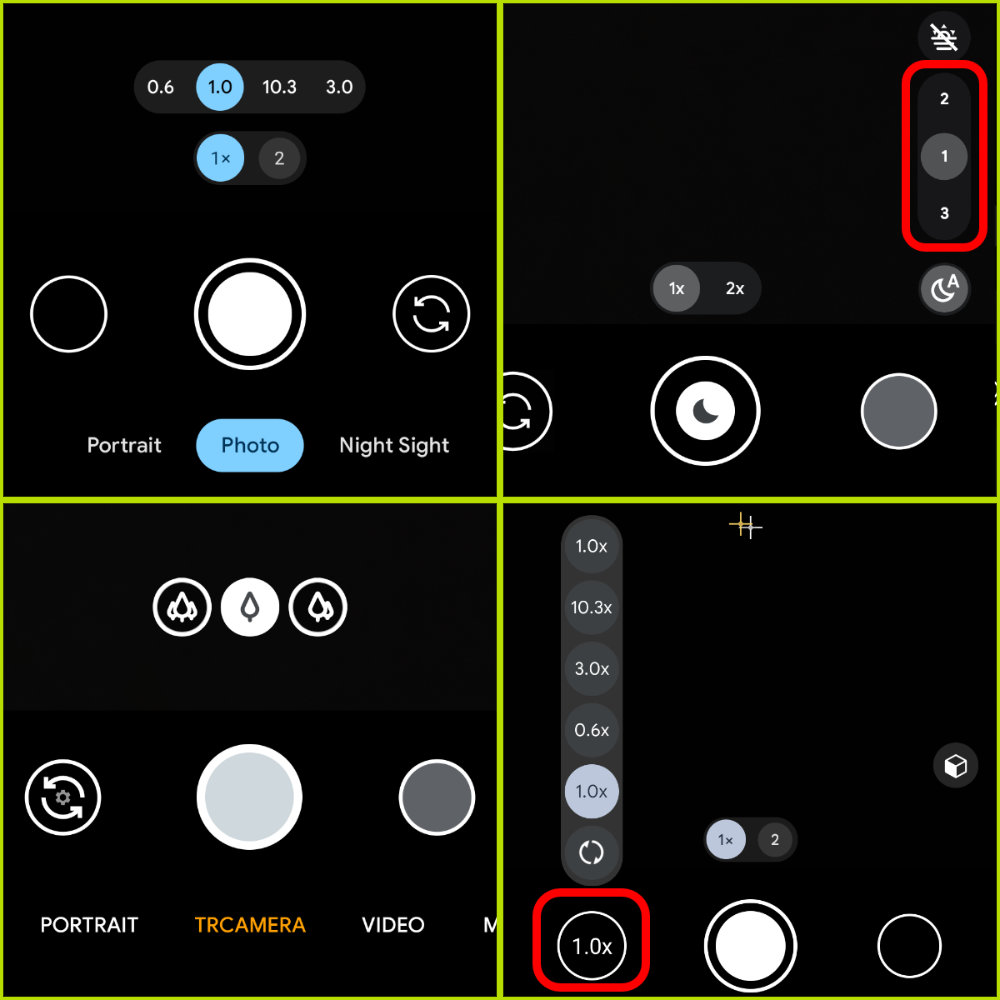
Some mods require you to enable this in the settings. Search for auxiliary cameras, camera modules, lens settings, aditional cameras, camera IDs, and similar expressions. Sometimes you just have to enable the option and GCam will auto detect the different cameras. Sometimes you also have to manually select the cameras or type the camera IDs (see the next section for more info). Some examples:
- A GCam 7 mod where you have to manually enable the feature and each lens: image 1, image 2.
- A GCam 8 mod that enables the feature by default, detects the different cameras, and lets you enable/disable them and change camera IDs: image;
- A GCam 9 mod that also enables the feature by default. To enable/disable/block some cameras, you need to type the camera IDs: image;
- Devices with restrictions: package names and fixes:
Some phones restrict access to all cameras, allowing only the main front/main rear cameras to work with 3rd party apps. However, many allow some apps to access everything, so we take advantage of that. That's why GCam mods are available in different "package names". Please read the section "what are package names" to understand how this works and what are the package names some phones/brands need.
As a quick example, the "snap" or "snapcam" package often works on OnePlus devices with Snapdragon processors. In this example, you'd download the 1st apk ("snap", red). If you had a Samsung instead, you'd need one of the "samsung" packages, so you'd pick the 5th apk ("scan3d", green):
Some phones, however, are really locked down and when a special package name doesn't work, the solution is usually to unlock the phone/root it and install a fix. Custom ROMs usually also don't have any restrictions, so you can install any apk/package name and even have multiple GCams installed side-by-side.
If your phone has these limits, you can try to find a forum thread or group and see what other users are suggesting/doing.
- Camera IDs: How to find them?
As mentioned above, each camera/sensor/lens has a number ID. Many phones use 0 for the rear main camera, 1 for the main front camera, 2 for wide rear, 3 for telephoto, etc... but this is not always the case.
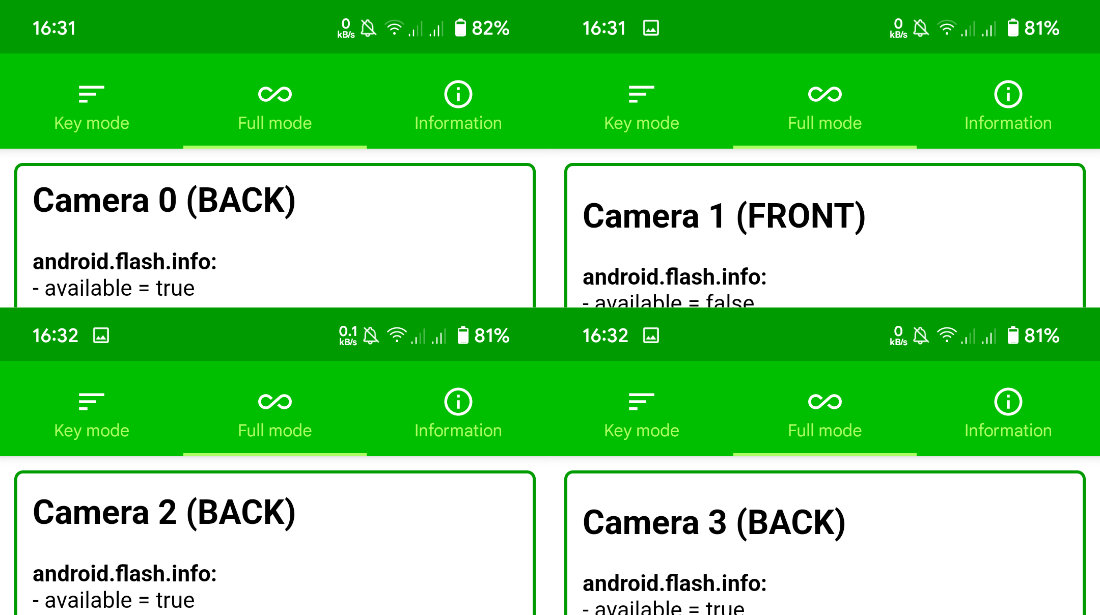
The easiest way to find out these IDs is to use an app. One of the modders - BSG - makes the "Camera2 Test App" app available in different package names. As mentioned in the section above, if you have a phone that restricts access to all cameras, you may need a specific package name. Install the correct one for your phone, open it, and in "Full Mode" you can see the ID of each camera and it's capabilities:
- Camera IDs: Stock vs Custom ROMs:
On some phones, the camera IDs on the stock Android ROM are different from those used on custom ROMs. For example, the main back camera can be ID = 56 on HyperOS/MIUI (Xiaomi) or OneUI (Samsung), but custom ROMs following stock Android will use ID = 0.
This can cause some issues with config files. If it's created on a custom ROM, GCam can crash if loaded by a user using the original software as GCam can't find any camera with those IDs (and vice versa).
# What is HDRnet / Instantaneous HDR / ZSL HDR: Quality and Heat »
More recent GCam mods have a HDR mode called HDRnet (sometimes called instantaneous HDR or fast HDR). It's essentially a ZSL (zero shutter lag) HDR option.
This feature works by constantly saving pictures (frames) while the app is open. When the user takes a picture, it uses some of these old frames to create the final picture.
In terms of dynamic range, it's somewhere between HDR+ Enhanced (good, slow) and HDR+ On (bad, fast), with the benefit of being fast. It also has some downsides:
- Fast, but worse dynamic range than HDR+ Enhanced (bright areas might be over exposed);
- Higher battery drain and more heat as it's always saving frames (especially on older devices);
- Since old frames are reused, the final file may be different from what you were seeing;
- If many frames are used (some mods let you choose), if you move the camera, the picture may have lots of artifacts. If you're tweaking this, keep the number low to avoid these issues.
Some mods have a button on the viewfinder that allows you to enable this mode, allowing you to use HDR+ Enhanced when you want quality, but quickly switch to HDRNet if you need to take pictures quickly.
Since different users use their phones differently and the hardware also varies a lot, you should test this feature to see if it's a good fit for your hardware and the way you use your camera.
(See also: Different HDR modes.)
# What is "Lib Patcher" and "Libs" »
Lib patcher and Libs affect noise levels, detail vs smoothness, colours, add/remove brightness to shadows, etc. Some GCam versions don't support either, some support one of them, and some have both. Explore the settings menu of the GCam version you're using.
- Lib Patcher: Users need to find the best values for their hardware. Different camera sensors need different values. Each user also has different preferences: some like more detailed/noisy images while others like smooth pictures.
- Libs: Libs are created by a modder and just like "lib patcher", it affects the image quality, detail, etc. The main difference is that they are ready to use and you can't modify them.
Since this is very dependent on the hardware used by our phone and on personal preferences, it's not possible to recommend a lib or lib patcher values that work well for everyone.
[ Note: If you're having issues loading libs, see Why can't I load libs? ]
# How to use Playground / AR Stickers »
Follow this guide.
# How to load and export Google Camera settings (xml/gca/acg/ config files) »
Config files are essentially settings for GCam. Some versions support import/export of .xml, .gca, .acg, etc, configuration files.
Unfortunately every modder does its own thing and there are no universal steps for all versions.
On the download page you'll usually find a link to the "configs page" (example). There you'll find information on the folder where configs should be moved to (the "configs folder") and how to load the config.
For the earlier GCam mods that followed a similar structure, see this tutorial.
# Fix for black and white pictures »
- Make sure you're not using a profile or config that creates black and white pictures.
- Some mods support "luts" or "filters". Make sure you're not using one of them.
- If you've changed any settings, make sure the saturation values are correct.
- On very old mods, check if there's a "black and white" mode inside the settings page and disable it.
# What's "Sabre"? »
Sabre is a merge method created by Google that improves photo quality on some modes. Some call it "super resolution" because of the sharpness/detail improvements. It's used by Google for Night Sight, but some GCam mods also use it for zoomed photos and HDR+ Enhanced. Works with the RAW10 format (other RAW formats may result in black photos).
Sometimes Sabre isn't supported by all cameras sensors (eg: non-Sony sensors) and Google Camera will crash after taking a picture. In this case, the only solution is to disable Sabre (only available on some mods) and restart the app.
# What's "Shasta"? »
Shasta or Shasta factor affects the quality of the image, especially in low light.
Higher values may help in astrophotography mode. You can also use it to control green noise in the pictures.
# What's "PseudoCT"? »
PseudoCT toggle helps to manage AWB. It may improve colour temperature. (by Nikita)
# What's "Google AWB", "Pixel 3 AWB", etc ? »
The Pixel 3 AWB (Auto White Balance) was created by BSG and Savitar, and uses Pixel 3's colour calibration info instead of the info from your phone. This is different from the Colour Balance options available in the viewfinder.
Other settings with similar names (Pixel 2 AWB, Google AWB, etc) are also included in some apps. Only some GCam mods come with this setting. Usually it only works with one of the "Pixel" models and sometimes it can result in pictures that look different from reality (e.g.: yellow street lights can become white).
Since results may vary from phone to phone and also depends on personal taste, you should do your own tests to see if it's worth using this or not.
# How to use GCam without GApps »
GCam requires Google Play Services to run, meaning that it will crash if you try to run it on a phone without GApps. To use GCam, you can't go fully "google free" (GCam itself is a Google product called "Google Camera" or "Pixel Camera").
microG:
You can use microG, an open-source re-implementation of Google's proprietary libraries. Simply install microG's Service Core app and GCam will work.
Gcam Services Provider:
The other alternative is to use the Gcam Services Provider app that "simulates" what GCam needs to run. Download the apk here and visit the project's Github for more information.
# What's "Hot Pixel Correction"? »
Reduces the number of "hot pixels" on the picture. Hot pixels are usually red or white dots in the picture.
# What's "Lens Shading Correction"? »
Fixes vignetting (darker area around the centre of the picture).
# What's "Black Level"? »
Using a custom "black level" value usually fixes pink or green photos on phones with this problem.
Some versions allow users to use custom values for each colour channel (Crimson Red, DarkGreen, Light Green, Blue). This can be used to improve results in low light.
# What's "Hexagon DSP"? »
Hexagon DSP is an image processor available on some SoCs (processors) and improves processing performance while using less battery. Leaving it ON usually improves speed, but doesn't work on all phones.
Some apks are tagged with "NoHex" or "NoHexagon". Other apps have a "allow unknown devices" setting that enables/disables Hexagon.
# What's "Buffer fix"? »
The "buffer fix" option fixes viewfinder lag on some phones affected by this problem (usually phones with Mediatek processors). There's a downside to this setting: on some phones users have to double tap the shutter button in order to take pictures.
Magisk modules are available for some phones, however that requires the phone to be unlocked and rooted.
# What's "Pixel 3 Color Transform"? »
This replaces the code cameraAPI2 SENSOR_COLOR_TRANSFORM1 and SENSOR_COLOR_TRANSFORM2 with that of pixel 3 (works for the creation of DNG images). Changes colours slightly.
# What's "HDR+ underexposure multiplier"? »
This adjusts the under exposure (if auto exposure is enabled). Set HDR+ underexposure multiplier to 50% and compare it with "normal" photos. Some users use it on 0%, but you need to test and see which value is better for your phone.
# What's "Default GCam CaptureSession"? »
Android 9+ only. Used for capturing images from the camera or reprocessing images captured from the camera in the same session previously. More info on Google's developer website: CameraCaptureSession.
# What's "HDR+ parameters" or "HDR Frames"? »
HDR+ Enhanced works by taking multiple frames ("pictures") and merging them to create the final result.
If you select, for example, "20", that means that GCam will use 20 frames. More frames usually means better quality, but it's also slower than less frames, especially in harsh/dark conditions.
For day to day quick use, use a low number of frames (between 3 and ~12, depending on the speeds you need). If you want better quality or don't need the speed, then you can increase this number. Usually you stop seeing any difference after 20 frames, but some GCam mods support up to 50 frames.
What some users do is to either have more than one GCam mod installed, one for fast pictures and one for slow, quality pictures. If you use config files, you can have one config for speed and one for quality. Some GCam mods have "profiles" and you could use different ones for quality/speed.
(See also: Different HDR modes.)
# "Autoexposure correction" and "Correction Night Sight" »
Controls the shutter speed. Long shutter speeds can be used for long exposure photos, but it doesn't work well on all phones and users often report crashes. On the OnePlus 3, long exposure times only work with the "Pixel 1" model and crashes with other models. Sometimes going a step up or down can help fixing the pink tint that affects some phones.
# Portrait Mode vs Lens Blur »
Some versions of this port come with these two features. Portrait Mode works better with humans and (sometimes) animals and has better edge detection. Lens blur is older and works with objects too, but it has worse edge detection and sometimes it blurs what shouldn't be blurred.
# What's "Recompute AWB"? »
Similar to other Auto White Balance (AWB) settings. Device compatibility limited.
To see the difference, take two pictures - one with this setting enabled and another with it disabled - and compare the results. Depending on the GCam version you're using, you might have to disable other AWB settings in order for it to work.
# What's "Select iso priority"? »
This is a new piece of code and no one knows exactly what it does, but seems to affect the viewfinder. Ignore it.
# What's "Metering mode"? »
This changes the way Google Camera measures the light of the scene on the viewfinder. It doesn't change the final picture, but it may affect the areas of the viewfinder that are darker/brighter.
Some versions come with multiple settings for this option. Some might work on your phone, while others won't do anything. It all depends on the hardware/software of your phone.
# How to change your phone's fingerprint? »
1. Using Magisk Manager, install the MagiskHide Props Config module and reboot.
2. (screen recording) Using a terminal app (e.g.: Termux), type su, press "enter" on your keyboard, and grand root access.
3. Type props > press enter > type 1 (to change fingerprints) and confirm by following the instructions.
4. Pick the phone you want to "emulate".
5. After changing the fingerprint, choose the option to reboot.
# What's video bitrate? »
The video bitrate is the number of bits per second of a video. Higher bitrates, results in bigger files and better quality. Some slower hardware might struggle to play files with high bitrates. Read this wikipedia page to learn more.
Some versions of the Google Camera mod allow users to change this. Usually the default setting (or "auto") is good enough, but you can use higher values if you find video quality to be bad.
# Is it possible to improve processing speed? »
Most Google Camera modes work by taking multiple photos and then merging them to create a final photo (HDR). This takes a few seconds and during this time you'll see a "processing..." notification. The time it takes to process depends on how fast your processor is and on the picture taken, but it's usually between 5 and 15 seconds.
Usually there's 3 modes: HDR Off, HDR+ On (or HDR+ Auto), and HDR+ Enhanced (or HDR+ On).
On GCam 6:

On GCam 7:

HDR Enhanced is the best one in terms of quality, but it's also slower than the other two. If you are in a hurry, you can try to use HDR+ On (the middle setting).
Some versions let you choose the number of HDR frames. Sometimes it's called HDR Quality, HDR Frames, HDR Speed, etc. Try a lower value, restart the app, and try again.
There are some features that are more resource intensive than others. Night Sight (aka Night Mode) is one of them and we should expect some processing time. If your camera has a big resolution (e.g.: 48MP), it will take longer to process images (the solution for this is to select a lower resolution).
# What's "Face Warping"? »
Some apps allow you to enable/disable a feature called Face Warping correction. When enabled, Google Camera tries to correct lens distortion when a subject's face is distorted.
# What's JPG Quality, JPG Compression, etc? »
JPG, or JPEG, is a lossy image format. A file with 95% quality is bigger (more MBs) and retains more details than a file with 85% quality. Most default camera apps use a default quality of 80-85%. JPG quality for images you can find on most websites is usually between 60 and 85%.
It's a trade-off between quality/detail and file size: a 80% quality file can be 2MB, while a file with 95% quality can be 6MB.
I personally use 97% quality (or 95% when I can't set 97%) for mobile photography. From my tests, anything under 95% starts showing compression artefacts which are visible when I zoom in. I couldn't see difference in image quality after 97%. For me 100% quality is overkill: not only file sizes are 1 or 2 MB bigger, but I couldn't see any quality improvements.
If you value quality, use low JPG compression/high JPG quality. If you're constrained by storage space, then reduce the JPG quality.
# What's "instant_aec"? »
This is a camera2 api code from Qualcomm. There isn't much info about this, but seems to be related to AEC 3D/artificial reality (the technology itself allows us to create 3d images/videos from 2d images. Video about a camera that uses this tech: vimeo.com/282288552).
In practice, this setting seems to improve quality on some devices, but it's not available on all GCam versions or on all phones. It's up to you to test and see if you can see any differences.
On versions from Arnova8G2 we usually are presented with 3 settings that allow us to disable/enable the AEC backend:
0 - Disable
1 - Enable and set aggressive AEC algo to the backend
2 - Enable and set fast AEC algo to the backend
# Why can't I load libs? »
Warning: Libs don't work anymore on versions of LibLoader posted before 2019-07-01. Read why here.
Some GCam versions support libs, but while some ship libs with the apk, others download them from a Github repo or from one of the modders' server.
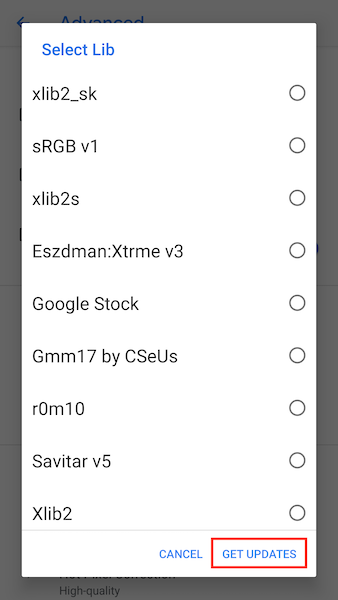
When you click on "get updates", it initiates an internet connection that downloads a few kilobytes of data (libs) and stores them locally. Since libs are added, removed, and updated often, the list of libs available for the GCam version you're using will change over time. Google's stock lib is included and used by default, meaning that the app will work if you don't download libs or if in the future this feature is discontinued.
There are a few pros/cons compared to shipping libs with GCam itself:
- Pros: Smaller apk file size; Libs can be updated/added without updating the apk file;
- Cons: GCam needs internet access (only when you "update") in order to download the lib files; This is likely to be broken in the future as modders move on to other things;
If nothing happens ~30 seconds after clicking on "get updates", it means that the update has failed. Make sure your phone is connected to the internet, that the app itself isn't being blocked from accessing it, and that Github.com isn't blocked on your network.
If everything is okay on your end, try again later: sometimes Github's API limit is reached and all requests are rate limited.
# How to fix green/pink blurred photos? »
Usually this is caused by GCam using an incompatible "model" for your camera. It's a common problem with some phone's front camera.
The solution is to change the "model" used. If one of the Pixel models is selected by default, try the Nexus 5X or 6P model, restart and try again.
# Missing or deleted photos bug »
- Portrait photos:
By default, Google Camera saves photos taken with the Portrait Mode on folders inside the main /DCIM/Camera folder, so some GCam versions include a setting that allows you to save them on the main shared folder. The setting name changes from dev to dev, but this is how it looks like on some versions:

Sadly, this isn't stable and sometimes some photos are lost. The solution is to keep this setting off or use a version that doesn't do it by default.
- Other photos:
- If they're displayed after a reboot: it's a system problem, Android isn't scanning the storage quickly enough to show new files on the gallery.
- If photos taken with other apps also get deleted: it's not a Google Camera problem.
- If you have apps that modify photos/files in some way: make sure they're not deleting them.
- If none of above: report the problem to the developer (usually by following the "changelog" link next to the download link) or ask for help on a thread or group for your phone.
# What's DCI-P3? »
Some versions come with a DCI-P3 option. On phones with displays that support DCI-P3, it should result in photos with more vibrant colours.
To learn more about this colour space, check the wikipedia page about DCI-P3.
# Can GCam save photos/videos to the SD Card? »
- Most GCam mods can only save files to the default /DCIM folder in the main storage of the phone because Google Pixel devices don't have SD cards.
- A very small number number of mods do allow you to save to the /DCIM folder in the SD card. For example, GCam 8.5 mods from Shamim (check his download page) have this option (Settings » File settings). The downside is that you need to go to the gallery to see your pictures/videos.
- You can use a 3rd party app like Tasker to automatically move all new files from the internal storage to the SD card.
# How to mirror selfies? »
This setting is only available on Google Camera 7 or newer (check the settings menu). It's not possible to enable/disable mirroring of pictures on older versions.
# How to save Portrait mode photos in the main folder »
Check this page where I talk about a setting and some 3rd party apps that will allow you to save pictures taken with GCam's Portrait Mode in the main /DCIM/Camera folder.
# Differences between GCam 5, 6, 7, 8, 9, etc »
Major Google Camera versions are usually released when Google releases a new device, but that seems to be changing as Google moves to release "feature updates". Some of the new features can be used with the port on non-Google devices, while others can't. Everything depends on how the feature works, the device's hardware, and if it requires any support by the OS/ROM.
For those using a GCam mod on non-Google devices, newer GCam bases might bring new features, however it always takes some time to port the old mod features to new versions (assuming old features are compatible with new GCams) and this might affect the quality of the photos. From a quality, compatibility, and stability point of view, the latest version is not always the best version.
If you want to know the changes between each GCam update, sites like XDA Developers, 9to5Google, etc, often release articles about changes and new features. Keep in mind that they might not work on non-Google phones.
Some articles about each version:
Google Camera 9.x:
Google Camera 8.x:
- 8.1: link
- 8.2: link
- 8.3: link
- 8.4: link
- 8.5: link
- 8.6: link, link
- 8.6: link, link
- 8.7: link, link
- 8.8: link, link
Google Camera 7.x:
Google Camera 6.x:
Google Camera 5.x:
# Forum threads, telegram help groups, etc »
Check this page for a list of forum threads, telegram groups, and useful files/tools for this port.
I suggest you find other people using the same phone as you and see which port/version/settings they're using. See if there's a GCam thread for your phone on XDA or posts on your phone's subreddit.
# How to save error logs »
If the app is crashing and you want to send a log for the developer, check the How to save a logcat with MatLog page.
# How create app clones »
To create clones of Google Camera apps, check my how to clone apps guide.
However, since many modders release different package names, you can use them instead.
# What's Camera GO / GCam Go »
Camera Go, also known as GCam Go, is a light version of the Google Camera app made for low end devices. While not as advanced or as good as regular GCam, it might still improve quality over the stock camera quality on some phones.
Another good thing about Camera Go is that it runs on phones without the camera2 api, which is required by GCam.
I maintain a list of stable ports here: Camera Go Ports.